
| 일 | 월 | 화 | 수 | 목 | 금 | 토 |
|---|---|---|---|---|---|---|
| 1 | 2 | 3 | 4 | 5 | 6 | 7 |
| 8 | 9 | 10 | 11 | 12 | 13 | 14 |
| 15 | 16 | 17 | 18 | 19 | 20 | 21 |
| 22 | 23 | 24 | 25 | 26 | 27 | 28 |
| 29 | 30 |
- mac user
- data개념
- pptpdf로변환
- terraformazure
- 테라폼조건문
- aws
- (user)없애기
- mac(user)
- 깃허브기초
- 테라폼조건식
- t101
- cidrhost로EC2의ENI에10개의ip를 장착
- terraform
- 가시다스터디
- Azure
- awsglue
- (user)terminal
- 테라폼함수
- awsworkshop
- 테라폼상태
- pptpdf
- t103
- terraform_data
- pptxpdf
- macterminal(user)
- azureterraform
- pythonpptpdf
- 테라폼스터디
- azureresource
- githubbasic
- Today
- Total
fullmoon's bright IT blog
[DOIK]Cloud Native PostgreSQL 오퍼레이터 정리 및 도전과제 본문

안녕하세요 휘영청입니다.
오늘은 DOIK 졸업과제로 Cloud Native PostgreSQL 오퍼레이터를 정리하고 졸업과제를 해보려고합니다.
S3 백업 도전!
[개념]
1. 기존 데이터베이스의 구조
데이터베이스는 사람들이 공동으로사용할 때 중복을 없애고 쉽게 접근할 수 있게끔 처리합니다.
저장장치에 저장해서 항상 사용할 수 있도록 운영하는 것이죠

데이터베이스의 개념을 딥하게는 모르지만 사용자, 프로그램이 데이터베이스 관리 시스템을 지나서 데이터베이스에 저장된다! 정도만 이해하고있습니다.
보통 데이터베이스 엔진이 올라가게 되면 인스턴스를 생성하게 되는데 데이터베이스 하나가 인스턴스 하나를 만들게 되는데
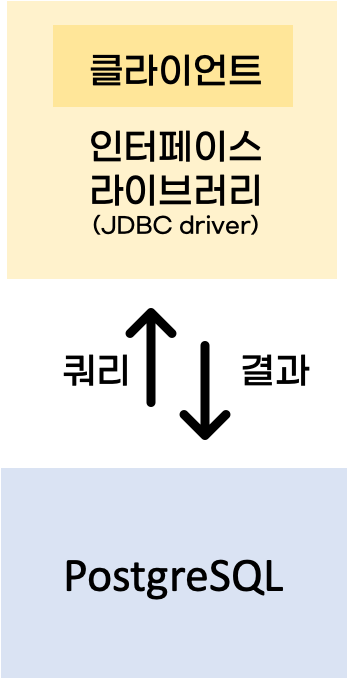
오늘 정리할 PostgreSQL는 하나의 인스턴스는 하나의 서버가 되는 개념입니다. 위의 데이터베이스의 개념이라면 PostgreSQL의 클라이언트-서버 프로세스 구조라면 이런거죠
2. PostgreSQL의 구조
2-1. PostgreSQL 데이터베이스 계층 구조

- 클러스터 Cluster : 데이터베이스들의 집합으로 이름으로 식별가능하다.
- 스키마 Schema : 개체들의 논리적인 집합이다.(테이블, 뷰, 함수, 인덱스, 데이터 타입, 연산자 )
- 데이터베이스 생성 시 자동으로 기본 스키마인 public 스키마가 생성되는데
- PostgreSQL 는 테이블의 집합을 스키마의 개념으로 사용한다. 스키마들의 집합 = 데이터베이스
- 테이블 Table : 가장 기본 구조. 표 = 테이블
- 테이블은 가로행(row) 과 세로열(column).
- row = 개체를 식별할 수 있다. (key)
- column = 컬럼의 특성의 데이터값 저장
3. CloudNativePG
쿠버네티스 환경에서 PostgreSQL 워크로드를 관리하는 도구입니다.
[링크참조]
https://cloudnative-pg.io/documentation/1.15.1/
CloudNativePG
CloudNativePG CloudNativePG is an open source operator designed to manage PostgreSQL workloads on any supported Kubernetes cluster running in private, public, hybrid, or multi-cloud environments. CloudNativePG adheres to DevOps principles and concepts such
cloudnative-pg.io
3-1. Architecture
High Availability 와 Scalability 를 위해서는 PostgreSQL database management system 을 제공해야합니다.
CloudNativePG는 클러스터를 제공하는데 비동기, 동기의 스트리밍 복제를 지원합니다. 복제된 서버는 multiple hot standby replicas로 동일한 Kubernetes cluster에서 동작합니다.
특별히 조건이 있는데요.
- Available services for applications:
- rw: applications connect to the only primary instance of the cluster
- ro: applications connect to the only hot standby replicas for read-only-workloads
- r: applications connect to any of the instances for read-only workloads
3-2. 데이터베이스 상태 관리
WAL(Write Ahead Log)방식을 적용합니다. 데이터베이스에 변경되는 작업을 먼저 파일에 기록한 후에, 파일에 저장된 기록을 실행하는 방법입니다. 장애가 나더라도 기록이 되니까 굿!
[링크참조]
https://cloudnative-pg.io/documentation/1.15.1/architecture/
Architecture - CloudNativePG
For High Availability and Scalability goals, the PostgreSQL database management system provides administrators with built-in physical replication capabilities based on Write Ahead Log (WAL) shipping. PostgreSQL supports both asynchronous and synchronous st
cloudnative-pg.io
Read-write workloads
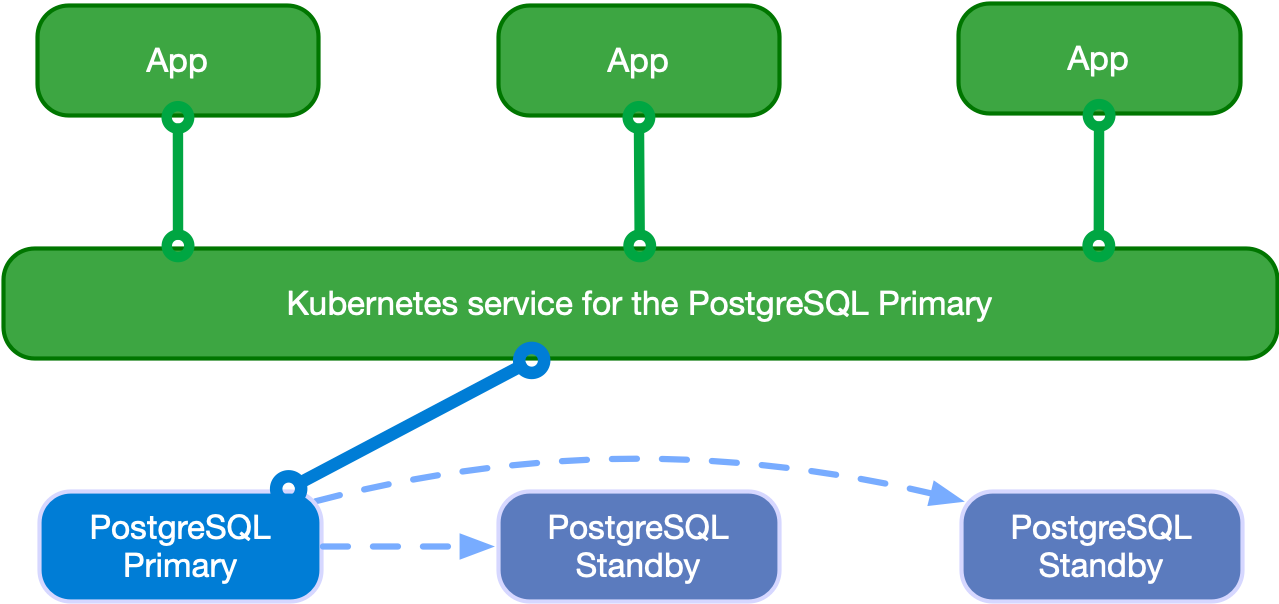
일시적으로 사용하거나 영구적으로 사용할 수 없을때 고가용성을 위해서 다른 인스턴스로 이동시킨다.
*중요
Read-only workloads
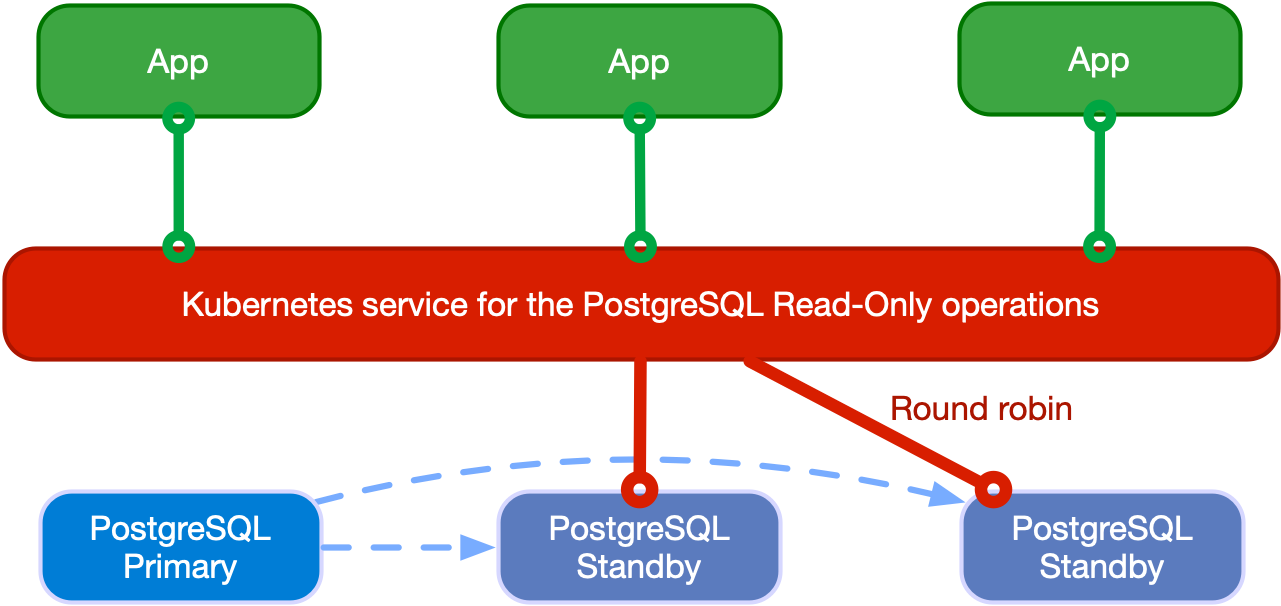
-RO 요청을 Standby 로 Round robin 방식으로 전달합니다.
[실습 - 기본 세팅 ]
1. helm, 오퍼레이터,cnpg 플러그인 설치
helm repo add cnpg https://cloudnative-pg.github.io/charts
helm install cnpg cnpg/cloudnative-pg -f ~/DOIK/5/values.yaml

url -sSfL https://github.com/cloudnative-pg/cloudnative-pg/raw/main/hack/install-cnpg-plugin.sh | sudo sh -s -- -b /usr/local/bin
cat ~/DOIK/5/values.yaml
nodeSelector: {kubernetes.io/hostname: k8s-m}
tolerations: [{key: node-role.kubernetes.io/master, operator: Exists, effect: NoSchedule}]오퍼레이터 설치 확인하기
kubectl get deploy,po

NAME                                  READY   UP-TO-DATE   AVAILABLE   AGE
deployment.apps/cnpg-cloudnative-pg   1/1     1            0           22m

NAME                                       READY   STATUS    RESTARTS   AGE
pod/cnpg-cloudnative-pg-5f8cc75df5-t2wlc   1/1     Running   0          22m
2. CRD 확인
k get crd
NAME                                  CREATED AT
backups.postgresql.cnpg.io            2022-06-25T13:59:38Z
clusters.postgresql.cnpg.io           2022-06-25T13:59:38Z
poolers.postgresql.cnpg.io            2022-06-25T13:59:38Z
scheduledbackups.postgresql.cnpg.io   2022-06-25T13:59:38Z
3. postgresql 클러스터 구성하기
operator에서 제공하는 CRD를 이용하여 postgresql 클러스터를 구성합니다.
kubectl apply -f ~/DOIK/5/mycluster1.yaml
cluster.postgresql.cnpg.io/mycluster

#클러스터확인하기
NAME        AGE     INSTANCES   READY   STATUS                   PRIMARY
mycluster   2m16s   2           2       Creating a new replica   mycluster-1
kubectl cnpg status mycluster

Cluster Summary
Name:               mycluster
Namespace:          default
System ID:          7113187956074160147
PostgreSQL Image:   ghcr.io/cloudnative-pg/postgresql:14.2
Primary instance:   mycluster-1
Status:             Cluster in healthy state
Instances:          3
Ready instances:    3
Current Write LSN:  0/5000060 (Timeline: 1 - WAL File: 000000010000000000000005)

Certificates Status
Certificate Name       Expiration Date                Days Left Until Expiration
----------------       ---------------                --------------------------
mycluster-server       2022-09-23 14:36:35 +0000 UTC  89.99
mycluster-ca           2022-09-23 14:36:35 +0000 UTC  89.99
mycluster-replication  2022-09-23 14:36:35 +0000 UTC  89.99

Continuous Backup status
Not configured

Streaming Replication status
Name         Sent LSN   Write LSN  Flush LSN  Replay LSN  Write Lag  Flush Lag  Replay Lag  State      Sync State  Sync Priority
----         --------   ---------  ---------  ----------  ---------  ---------  ----------  -----      ----------  -------------
mycluster-2  0/5000060  0/5000060  0/5000060  0/5000060   00:00:00   00:00:00   00:00:00    streaming  async       0
mycluster-3  0/5000060  0/5000060  0/5000060  0/5000060   00:00:00   00:00:00   00:00:00    streaming  async       0

Instances status
Name         Database Size  Current LSN  Replication role  Status  QoS         Manager Version
----         -------------  -----------  ----------------  ------  ---         ---------------
mycluster-1  33 MB          0/5000060    Primary           OK      BestEffort  1.15.1
mycluster-2  33 MB          0/5000060    Standby (async)   OK      BestEffort  1.15.1
mycluster-3  33 MB          0/5000060    Standby (async)   OK      BestEffort  1.15.1
(여기까지도 험난했다..)
[도전과제]
5. CloudNativePG Challenge Task
[참고링크]
https://cloudnative-pg.io/documentation/1.15.1/backup_recovery/
Backup and Recovery - CloudNativePG
Backup and Recovery The operator can orchestrate a continuous backup infrastructure that is based on the Barman tool. Instead of using the classical architecture with a Barman server, which backs up many PostgreSQL instances, the operator relies on the bar
cloudnative-pg.io
보통 Postgre용 재해 리커버리 솔루션으로 사용하는 barman으로 백업을 하곤 합니다
백업 카탈로그, 증분 백업, 보존 정책, 원격 복구, WAL 파일 및 백업 아카이브 및 압축을 지원하죠
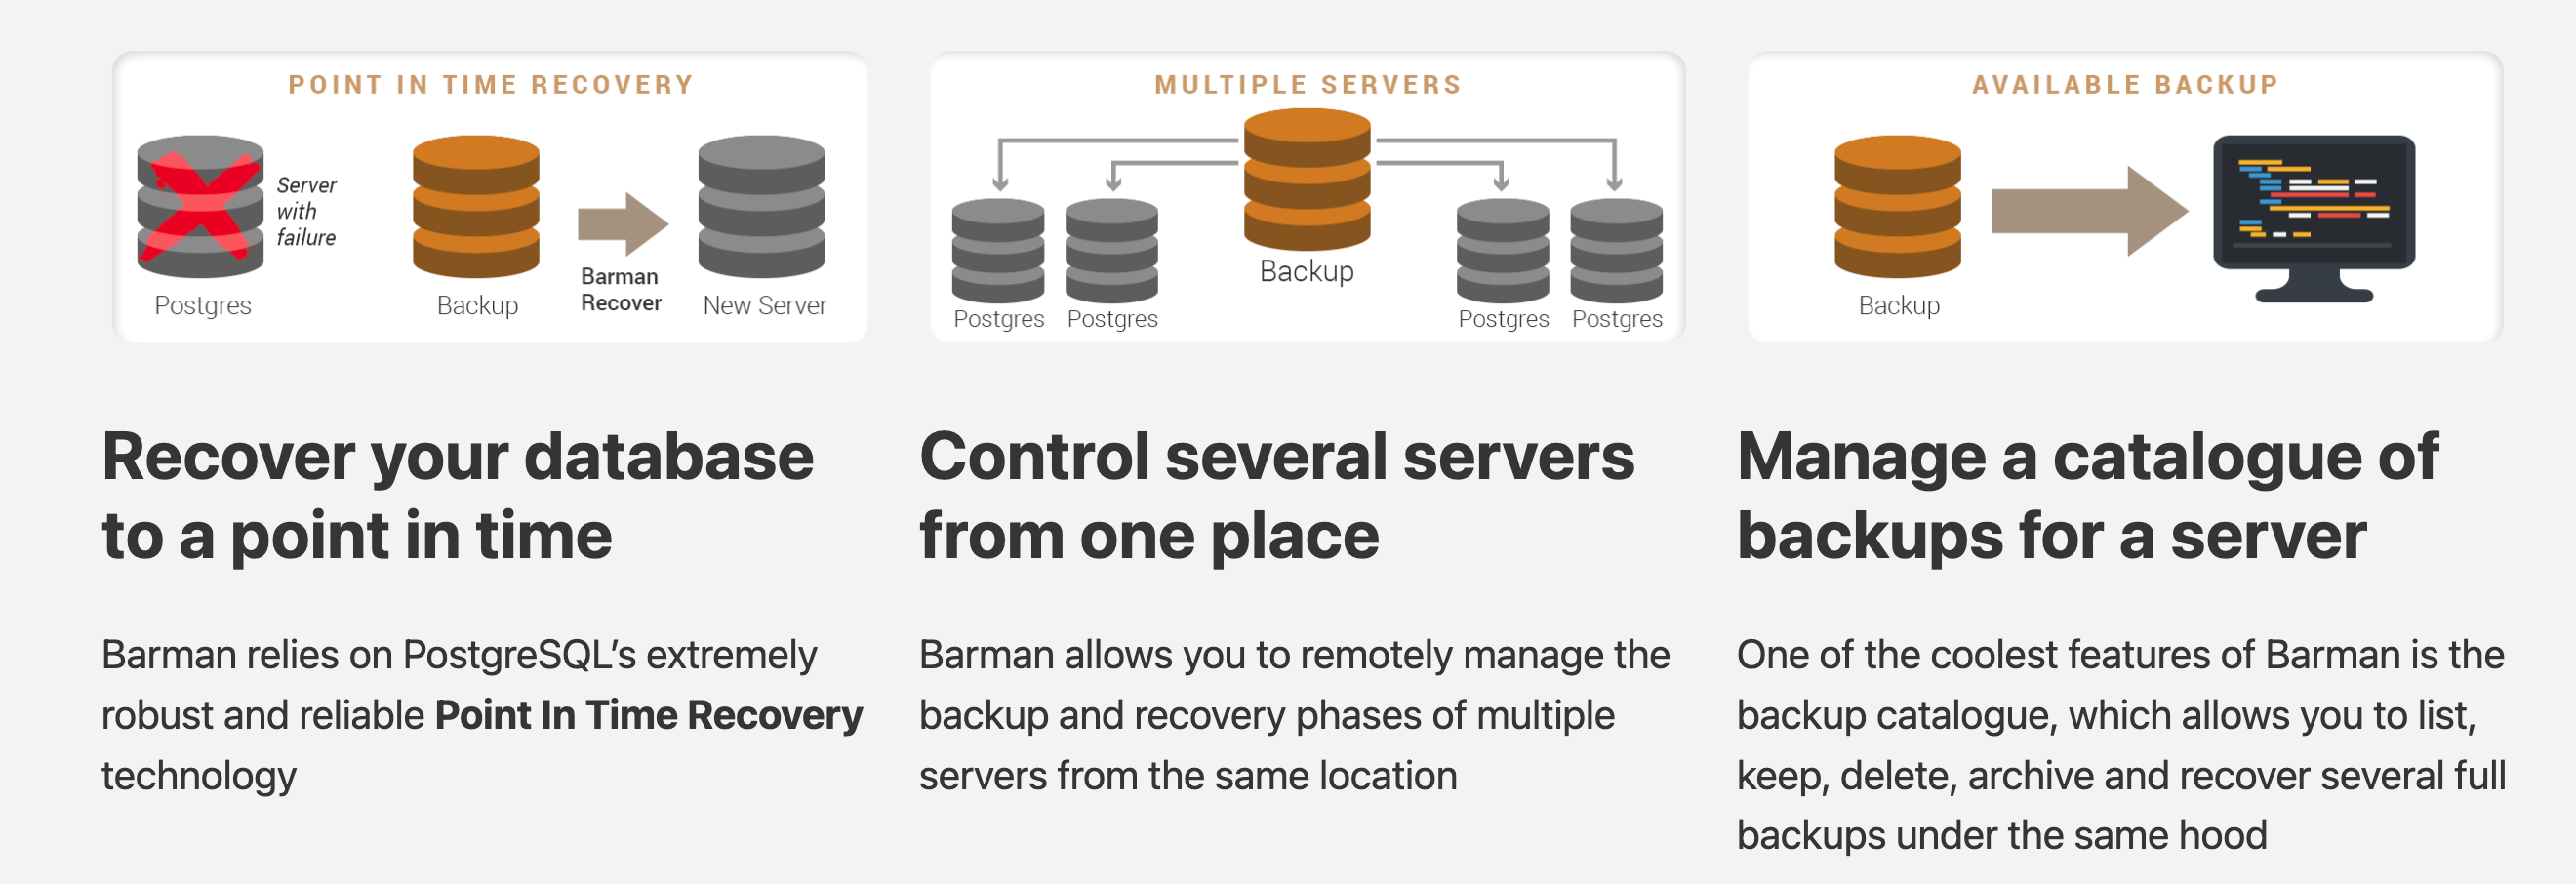
하지만 클라우드 프로바이더에서도 이 백업을 지원합니다!
백업 : AWS S3에 백업을 한번 해보겠습니다. 이것말고도 애저랑 구글도 지원합니다 :)
(You can archive the backup files in any service that is supported by the Barman Cloud infrastructure)
1. Install aws cli v2를 합니다. AWS 계정이 있으면 configure로 접속해서S3를 CLI로 조정할 수 있어요.
aws configure
AWS Access Key ID [None]: 123
AWS Secret Access Key [None]: 123
Default region name [None]: ap-northeast-2
Default output format [None]:
2. S3 버킷을 만들고 이름 환경변수 지정 후에 조회합니다.
root@k8s-m:~# aws s3 mb s3://fullmoonhwis3001 --region ap-northeast-2
make_bucket: fullmoonhwis3001

root@k8s-m:~# MyS3=fullmoonhwis3001 #이름 동일하게 해야합니다

root@k8s-m:~# aws s3 ls
2022-06-26 00:05:54 fullmoonhwis3001
3. AWS IAM User 정보를 Secret 으로 생성합니다. 그리고 잘 되었나 확인하기!
사용되는 액세스 키에 파일을 업로드할 수 있는 권한이 있어야 합니다.
kubectl create secret generic aws-creds --from-literal=ACCESS_KEY_ID=123 --from-literal=ACCESS_SECRET_KEY=123
secret/aws-creds created
자격 정보는 Kubernetes 내에 저장되며 암호화됩니다 !
kubectl get secret aws-creds -o json | jq
{
  "apiVersion": "v1",
  "data": {
    "ACCESS_KEY_ID": "123",
    "ACCESS_SECRET_KEY": "123"
  },
  "kind": "Secret",
  "metadata": {
    "creationTimestamp": "2022-06-25T15:17:56Z",
    "name": "aws-creds",
    "namespace": "default",
    "resourceVersion": "8198",
    "uid": "123"
  },
  "type": "Opaque"
}
4. 클러스터 신규 생성하고 버킷에 백업이 잘 되어있는지 확인합니다
S3가 사용하고자 하는 destinationPath 입니다. 내가 백업하고자 하는 곳이죠. 환경변수로 지정해놨기 때문에 걱정없어요
cat ~/DOIK/5/mycluster3.yaml
───────┬───────────────────────────────────────────
       │ File: /root/DOIK/5/mycluster3.yaml
───────┼───────────────────────────────────────────
   1   │ apiVersion: postgresql.cnpg.io/v1
   2   │ kind: Cluster
   3   │ metadata:
   4   │   name: mycluster
   5   │ spec:
   6   │   instances: 3
   7   │   storage:
   8   │     size: 3Gi
   9   │   postgresql:
  10   │     pg_hba:
  11   │       - host all postgres all trust
  12   │   backup:
  13   │     barmanObjectStore:
  14   │       destinationPath: "s3://${BUCKET}"
  15   │       s3Credentials:
  16   │         accessKeyId:
  17   │           name: aws-creds
  18   │           key: ACCESS_KEY_ID
  19   │         secretAccessKey:
  20   │           name: aws-creds
  21   │           key: ACCESS_SECRET_KEY
───────┴───────────────────────────────────────────
5. 하위 디렉터리 포함 확인합니다.
#--recursive 옵션은 하위까지 모두 clone하는 기능

aws s3 ls s3://$MyS3 --recursive --human-readable --summarize
2022-06-26 00:46:16   16.0 MiB mycluster/wals/0000000100000000/000000010000000000000001
2022-06-26 00:46:17   16.0 MiB mycluster/wals/0000000100000000/000000010000000000000002
2022-06-26 00:46:19  338 Bytes mycluster/wals/0000000100000000/000000010000000000000002.00000028.backup
2022-06-26 00:46:20   16.0 MiB mycluster/wals/0000000100000000/000000010000000000000003
2022-06-26 00:46:22   16.0 MiB mycluster/wals/0000000100000000/000000010000000000000004
2022-06-26 00:46:23  338 Bytes mycluster/wals/0000000100000000/000000010000000000000004.00000028.backup
2022-06-26 00:50:09   16.0 MiB mycluster/wals/0000000100000000/000000010000000000000005

Total Objects: 7
   Total Size: 80.0 MiB
6. 백업실행 하고 잘 있는지 확인해야죵?
 cat << EOF | kubectl apply -f -
apiVersion: postgresql.cnpg.io/v1
kind: Backup
metadata:
  name: first-backup
spec:
  cluster:
    name: mycluster
EOF
backup.postgresql.cnpg.io/first-backup created
* 에러
kubectl cnpg status mycluster
Cluster Summary
Name:               mycluster
Namespace:          default
System ID:          7113210639863652370
PostgreSQL Image:   ghcr.io/cloudnative-pg/postgresql:14.3
Primary instance:   mycluster-1
Status:             Cluster in healthy state
Instances:          3
Ready instances:    3
Current Write LSN:  0/5000060 (Timeline: 1 - WAL File: 000000010000000000000005)

Certificates Status
Certificate Name       Expiration Date                Days Left Until Expiration
----------------       ---------------                --------------------------
mycluster-ca           2022-09-23 16:05:04 +0000 UTC  89.99
mycluster-replication  2022-09-23 16:05:04 +0000 UTC  89.99
mycluster-server       2022-09-23 16:05:04 +0000 UTC  89.99

Continuous Backup status
First Point of Recoverability:  Not Available
Working WAL archiving:          Failing
WALs waiting to be archived:    6
Last Archived WAL:              -
Last Failed WAL:                000000010000000000000001   @   2022-06-25T16:14:20.764908Z

Streaming Replication status
Name         Sent LSN   Write LSN  Flush LSN  Replay LSN  Write Lag  Flush Lag  Replay Lag  State      Sync State  Sync Priority
----         --------   ---------  ---------  ----------  ---------  ---------  ----------  -----      ----------  -------------
mycluster-2  0/5000060  0/5000060  0/5000060  0/5000060   00:00:00   00:00:00   00:00:00    streaming  async       0
mycluster-3  0/5000060  0/5000060  0/5000060  0/5000060   00:00:00   00:00:00   00:00:00    streaming  async       0

Instances status
Name         Database Size  Current LSN  Replication role  Status  QoS         Manager Version
----         -------------  -----------  ----------------  ------  ---         ---------------
mycluster-1  33 MB          0/5000060    Primary           OK      BestEffort  1.15.1
mycluster-2  33 MB          0/5000060    Standby (async)   OK      BestEffort  1.15.1
mycluster-3  33 MB          0/5000060    Standby (async)   OK      BestEffort  1.15.1
왜 안되는거냐아아아
걍 지워버리자
kubectl delete pvc/mycluster-1 pod/mycluster-1
persistentvolumeclaim "mycluster-1" deleted
pod "mycluster-1" deleted

#어차피 장애 복구 되니까능!
kubectl cnpg status mycluster
Cluster Summary
Name:               mycluster
Namespace:          default
System ID:          7113210639863652370
PostgreSQL Image:   ghcr.io/cloudnative-pg/postgresql:14.3
Primary instance:   mycluster-2
Status:             Cluster in healthy state
Instances:          3
Ready instances:    3
Current Write LSN:  0/8000060 (Timeline: 2 - WAL File: 000000020000000000000008)

Certificates Status
Certificate Name       Expiration Date                Days Left Until Expiration
----------------       ---------------                --------------------------
mycluster-server       2022-09-23 16:05:04 +0000 UTC  89.99
mycluster-ca           2022-09-23 16:05:04 +0000 UTC  89.99
mycluster-replication  2022-09-23 16:05:04 +0000 UTC  89.99

Continuous Backup status
First Point of Recoverability:  Not Available
Working WAL archiving:          OK
WALs waiting to be archived:    0
Last Archived WAL:              000000020000000000000007.00000028.backup   @   2022-06-25T16:18:12.219128Z
Last Failed WAL:                -

Streaming Replication status
Name         Sent LSN   Write LSN  Flush LSN  Replay LSN  Write Lag        Flush Lag        Replay Lag       State      Sync State  Sync Priority
----         --------   ---------  ---------  ----------  ---------        ---------        ----------       -----      ----------  -------------
mycluster-3  0/6000028  0/6000028  0/60000A0  0/60000A0   00:00:00.001179  00:00:00.001179  00:00:00.001179  startup    async       0
mycluster-4  0/8000060  0/8000060  0/8000060  0/8000060   00:00:00         00:00:00         00:00:00         streaming  async       0

Instances status
Name         Database Size  Current LSN  Replication role  Status  QoS         Manager Version
----         -------------  -----------  ----------------  ------  ---         ---------------
mycluster-2  33 MB          0/8000060    Primary           OK      BestEffort  1.15.1
mycluster-3  33 MB          0/60000A0    Unknown           OK      BestEffort  1.15.1
mycluster-4  33 MB          0/8000060    Standby (async)   OK      BestEffort  1.15.1
2번이 대신해주고 백업도 잘 돌아간당
[백업 된 파일 확인 완료!]
aws s3 ls s3://$MyS3 --recursive --human-readable --summarize

2022-06-26 01:18:11   1.4 KiB mycluster/base/20220626T101811/backup.info
2022-06-26 01:18:13   6.2 MiB mycluster/base/20220626T101811/data.tar
** 리소스 삭제
# 백업 삭제
kubectl delete backup first-backup

# S3 버킷 내의 객체 삭제
aws s3 rm s3://$MyS3 --recursive
aws s3 ls s3://$MyS3 --recursive --human-readable

# S3 버킷 삭제
aws s3 rb s3://$MyS3

# 클러스터 삭제
kubectl delete cluster mycluster
이렇게 도전과제 까지 하고 DOIK 스터디를 마무리했는데요.
이번에는 조금 어려웠던 것 같아요. 뭔가 데이터베이스에 대한 기본도 부족해서.. 역시 언제나 공부가 필요한 것같네용 ㅎㅎㅎ
늘 감사한 가시다님 :)
'Cloud > k8s' 카테고리의 다른 글
| [CKA][쿠버네티스] CKA (눈물의) 합격 후기..MacOS PSI 에러 + 시험유형 공유 (4) | 2023.04.08 |
|---|---|
| [PKOS] AWS kOps 설치 및 기본 사용 (0) | 2023.03.11 |
| Kubenetes Operator Study - Concept for newbie (1) Controller and Operator (0) | 2022.06.10 |


